MIDAS stands for Motif Interactive Data Analysis System. The word "Motif" used here is the name of a set of standardized X Window interface guidelines that MIDAS observes. These guidelines were developed by the Open Software Foundation as a standard for how an X Window System application should "look and feel". MIDAS follows these standards to create a set of specialized X Windows that work together to control data analysis and deliver output in a convenient way.
MIDAS allows you to run all of the same code that you have up to now run from IDA. You add your own code to the MIDAS system the same way that you add it to regular IDA (by writing IDA procedures or by writing Prepmort code and building shareables).
MIDAS has one big drawback. It has not been as thoroughly debugged as other SLD Offline code. This is why most users still do most of their running from standard IDA.
It is easier to show you MIDAS than to describe it much further. This section of the Workbook will take you through an example of a MIDAS session.
First we will show you how to start a MIDAS session. Then we will cover:
MIDAS was substantially upgraded in June of 1995.
Users who have run previous versions of MIDAS
should make sure to delete any old versions of MIDAS saved options files
that may be in their login directory. Delete any files there named
IDA.DAT, HANDYPAK.DAT,
DSP.DAT or JAZELLE.DAT.
To start MIDAS, just type the command MIDAS from the DCL prompt.
If you get the error message "Could not open display,"
it means that MIDAS was unable to figure out how to open new X Windows on
your screen.
Use a SET DISPLAY command to
configure your display appropriately.
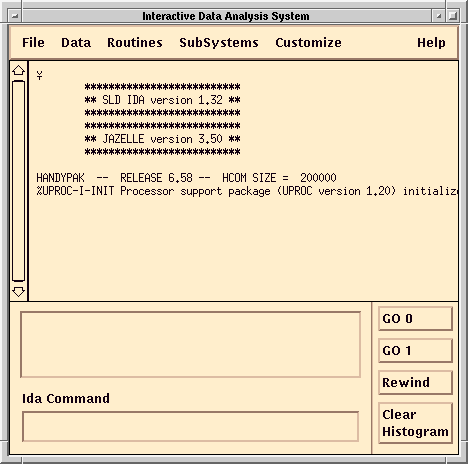
When MIDAS has started up, you should see a new window as follows:
This is the IDA Main Window. Other windows will pop up as needed throughout the session.
If the cursor is placed in this window, you will see it turn into a clock face while MIDAS is busy. You can only enter new information once the cursor has turned back into your standard cursor (usually an arrow).
The IDA Main Window has four sections. Starting from the bottom, these are:
One note before we go on to discuss the menus. As you work you will find that MIDAS gives lots of annoying unimportant messages in the window from which you first typed the command MIDAS. Most of these messages will look like:
   X Toolkit Warning:
       Name: HpRebinDim2YFromSlider
       Class: XmScale
       The scale minumum value is greater than or equal to the scale maximum value.
Just ignore them.
To use the help system, you need to have the MIDAS World Wide Web browser running on the same VMS Cluster as your MIDAS analysis session. The help system then works by redirecting the MIDAS Web browser to show the relevant help pages.
This help system will not work with other Web browsers such as Netscape or Mosaic.
If you do not already have the MDIAS Web browser running, start it now by typing the command web at the DCL prompt in a VMS window. Alternately, you can start it by selecting "World Wide Web" from the Applications menu of a VMS session manager.
If you get the error message "Could not open display,"
it means that the system was unable to figure out how to open new X Windows on
your screen.
Use a SET DISPLAY command to
configure your display appropriately.
The Data Menu
The Data Menu provides a simplified way to open a disk data file.
You could type an OPENTAPE READ command at the IDA command line,
but the Data menu lets you do this more easily.
From the Data menu select "Read from Disk..."
The following dialog box should pop up:

The dialog box shows you all of the data files on the SLDDAT disks.
To see all of the data files on another disk, enter the relevant disk and directory information in the "Filter" area of the dialog box, then hit the Filter button.
For example, try looking for the data set we have been using in this Workbook. Enter:
DISK$SLD_FAC0:[SLDWWW.WORKBOOK]*.JAZZDATA
Then hit the Filter button.
You should see two Jazzdata files.
Select:
REC94V11_MDST.JAZZDATA
Then hit the OK button to open this data set.
You can also just double-click on the data set name rather than single-clicking
on the data set name and hitting the OK button.
Throughout MIDAS, you will find cases where double-clicking is a quick
way to perform the most common actions.
The IDA Main Window should then include the actual OPEN READ command that the dialog box produced.
To Go 1 event, you could type GO 1 in the IDA Command line, but you can also do this by hitting the GO 1 button. Try it now.
Note again that the cursor turns into a clock face until MIDAS is done
processing the command.
The Routines Menu
The Routines menu gives you a convenient way to create and edit IDA procedures.
Begin creating a new IDA procedure by selecting "New..." from the Routines menu.
A new window should appear in which you can work on IDA procedures.

You can type a new procedure in this window. Try typing in the example that we used elsewhere in this Workbook.
   Ida>  VAR PT

   Ida>  DEF EVANAL

   Ida>    BANKLOOP PHCHRG
   Ida>      PT = 1./ PHCHRG%(HLXPAR(2))
   Ida>      HIST PT FROM 0 TO 10 ID 9 TITLE "Transverse P" REBIN
   Ida>    ENDLOOP

   Ida>  ENDDEF
When you hit the Compile button, the new procedure will be sent to IDA. You should see the message "Ida Routine Compiled Successfully" back in the IDA Main Window.
You can work on more than one different IDA procedure at a time. Select "New..." from the Control menu of the Routines window.
You should then get a new Routines window. Instead of typing a routine here, try another feature of the Routines window.
Select "Include File" from the new window's Control menu.
You should see a new dialog box. Specify a disk and directory in the Filter section of this dialog box as:
DISK$SLD_FAC0:[SLDWWW.WORKBOOK]*.IDA
Then hit the Filter button.
You should see the following list of choices:
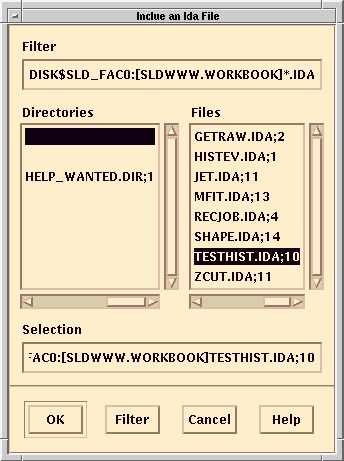
Select the example that creates a test set of histograms,
TESTHIST.IDA.
Then hit the OK button.
Your Routines window should now contain the IDA code to create a test set of histograms.
Hit the Compile button to send the new procedure to IDA. You should see the resulting "Hist ID assigned" messages back in the IDA Main Window.
Move the Routines windows out of the way for the rest of this exercise
(or you can close them from their Control menus).
The Subsystems Menu
Back in the IDA Main Window, the next menu contains three different subsystems
that let you view Histograms, Event Displays and Jazelle Banks.
The following three documents take you through these three subsystems in detail. This is where the most powerful parts of MIDAS live.
Create your
shareable
or run your
SETUP_COM
file just as you would to get ready to run from IDA.
But instead of typing IDA, type MIDAS.
There is nothing else different to do.
Some users may have an "SLD Midas" item in the Applications menu of their
Session Managers. This can also be used to start up MIDAS,
but it does not give you any opportunity to specify your own shareables
or SETUP_COM files. It is a better habit to always run MIDAS
by typing MIDAS from an appropriately configured DCL session.